Sharing Your Videos and Recordings
What good is a presentation if no one can see it? In order to distribute and share your video with others, you need to do two things. This page will walk you through these two steps:
- Modify the security settings to control who has the permission to watch your presentation at all.
- Actually share your presentations with them.
Additionally, scroll to the bottom for instructions on tracking viewing statistics after you’ve shared your presentation.
How to Share Your Presentation with Others
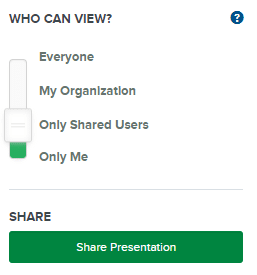
Changing the security settings, as detailed above, is necessary before you actually share the presentation with your viewers. There are three ways to share your presentations, which you can do by following these steps:
- Log in to MyMediasite.
- Locate and click on the presentation you wish to manage.
- In the window that appears:
- Ensure the slider aligns with “Only Shared Users”
- Click “Share Presentation”
Within the “Share Presentation” window, you have three options:
- Link is just what it looks like. Copy that URL and paste it into an email, a Tweet, a Canvas course, a web page, etc. Viewers can click on that link to access your presentation.
- Embed is the HTML embed code for your presentation. You can use this to actually embed your presentation into your web sites.
- Clicking Email will open up an email form and allow you to send a pre-written message to a custom list of recipients. If you use this method, beware that the recipient(s) of messages sent this way will see the message originating from “Mediasite System,” not you. Some viewers may think the message is Spam. We recommend copying and pasting the link into an email message you compose yourself using your own email account.
Links and embed code stay with the recording, which means if you decide to organize your stuff by dragging presentations into new folders, the link to the presentation will not change.
Important Considerations
- By default, any class recording will be set such that only registered class members can view the video.
- Every other recording or upload will default to “All Ross Users”, meaning viewers will have to use their uniqname to watch the video.
- DO NOT remove the security group “MediasiteAdministrators.” This appears on all presentations and is necessary for the proper functionality of Mediasite.
Changing Sharing and Security Settings
Mediasite allows you to control who gets to see your videos. For example, you can set it so that certain videos are only viewable by those with a U-M login, while others may be viewable by anyone in the world.
It is not yet possible to restrict the viewing of a presentation to specific people. However, with the use of “class groups” or “user groups,” it is possible to restrict viewing to those students registered to certain course sections, or to staff members within certain departments.
How to Change Who Has Access to Your Presentations
- As always, log in to MyMediasite.
- Locate and click on the presentation you wish to manage.
- In the window that appears, click the “Security” tab, as seen below.
- Modify, remove, or add permissions as you wish. Remember to click “Save” when finished.
At this time, permissions are limited to “Security Groups” rather than individual people.

Security Groups
You can limit the audience to your presentations by choosing among different “security groups”. At this time, permissions are limited to “Security Groups” rather than individual people. A security group is a collection of people. There are three kinds of security groups to choose from, and they are mutually exclusive, which means if you choose more than one, your viewers may experience problems.
- Everyone: Anyone with the link to your video will be able to view it anonymously. To choose this option, type “Everyone” into the box labeled “Add people or groups,” and click on the word “Everyone” when it appears. Remember to click “Save.”
- Authenticated Users: Anyone with the link will have to first sign in with their U-M credentials before they can watch the video. To choose this option, type “AuthenticatedUsers” into the box labeled “Add people or groups,” and click on the word “AuthenticatedUsers” when it appears. Remember to click “Save.”
- All Ross Users: Any person affiliated with Ross with the link will have to first sign in with their U-M credentials before they can watch the video. Non-Ross viewers (even those affiliated with U-M) will be denied access. To choose this option, type “All Ross Users” into the box labeled “Add people or groups,” and click on the word “All Ross Users” when it appears. Remember to click “Save.”
- Class/User Groups: Registered students in courses at Ross have their own security groups. For instance, a recording of LHC 350.001 can be restricted to only those registered students taking the course. By default, class recordings will be automatically restricted to this kind of security group. If you wish to change or expand your audience to include another class, you can begin typing that course name into the “Add people or groups” box to see a list of related groups. Choose the relevant option and remember to click “Save.”

The naming convention for class groups are as follows: YEAR:UNIQNAME COURSE # SECTION (SEMESTER). This can be seen in the example above.

Roles
When you add a security group, by default they will be given the role of a “Viewer.” This is adequate if all you want them to do is watch your presentation. You can instead choose “Editor” if you also wish for them to be able to modify the presentation within their own MyMediasite portal, or choose the role of “Moderator” if your presentation is live and questions will be coming in from viewers during live Q&A sessions.

How to See Who Has Watched Your Presentation
One of the strengths of Mediasite is its ability to track and tell you information such as who has watched your presentation, for how long, and other useful statistics. To do this:
- Log in to MyMediasite.
- Locate and click on the presentation you wish to manage.
- In the window that appears, click the “Analytics” tab, as seen below.

You’ll be given two options: “Dashboard,” and “Who’s Watching Now”.
- Who’s Watching Now will show you a list of viewers watching at that exact moment. If they’ve logged in (Authenticated Users), you will be able to see their uniqname. Otherwise, they’ll show up as “anonymous.”
- Dashboard will take you to the screen seen below, and breaks down the viewing statistics for the life of the presentation, potentially giving you valuable insight into your viewers’ habits.

Last Updated on January 10, 2023